
For more information about how to sell what you make, check out Kari Chapin’s Start a Handmade Business and Tara Swiger’s Marketing for Crafters.

As a crafter, your revenue is dependent on selling your handmade goods. Your Etsy store, your website, your booth at in-person events, and your social media are all working toward that one goal — but there’s one aspect of marketing that many crafters don’t take nearly as seriously as they should.
“My biggest piece of advice is to improve your product photography,” says Madison Eckendorf is a full-time craft & DIY buyer for zulily, a Seattle-based retailer website. Madison’s job is to scout Etsy stores for products which might do well on zulily — and, she says, it’s crucial that crafters consider product photography one of the most important aspects of their marketing.
But what’s the difference between good product images and not-so-good ones, and how do you make sure that your photos are good?
Here are a few DIY product photography tips from Madison, as well as some top bloggers and consultants.
Invest in a camera and get to know it:
While the iPhone does have a very powerful camera, a lot of crafters are still using older generations of phones — or worse, digital cameras that are outdated and just impossible to achieve good results with. And so, it’s important to prioritize.
“Get a decent camera,” advises Madison, who says that smartphones aren’t ideal, but crummy old point-and-shoots from 2002 are worse. Instead, invest in at least a mid-level machine with adjustable settings and a crisp, clear final image. And while that may sound like an expense that your business just can’t support, if it means you sell more products — which you will — it’s worth it. Plus, you can write it off on your taxes. For more detailed information about why a DSLR is totally worth the expense, check out this smart blog post from DIY Craft Photography.
This may also be intimidating if you’re not a particularly tech-savvy person, but blogger and consultant April Bowles-Olin says it’s absolutely worth it. Even if you don’t fancy yourself a product photographer, it’s important to wear that hat — at least temporarily — to help elevate your craft.
“Read your camera manual. Know how to use it.” April says, “It’s not fun, but it makes a big difference.” You don’t need to become an expert product photographer, but you do need to familiarize yourself with the settings. Read blog posts, ask an expert, or sift through online store reviews like Amazon to get a sense of what will work best for you.

Edit your photos:
Even if a nice-ish camera just isn’t in the cards, you can still take beautiful photos — and make them even better in post-production. Todd Porter and Diane Cu-Porter, of the White On Rice Couple blog, are professional photographers and filmmakers specializing in food, travel, lifestyle, who shoot on their iPhones every day. They believe that if you are going to shoot on your phone, it’s best to use an editing app. Post-processing is a great way to increase image quality. Consider different editing software like Adobe Photoshop or discover editing apps on your phone that can help with simple things like white balance, color correction, or color balance.
“A lot of people don’t know that there are editing apps,” says Diane, which are usually either free or inexpensive and can help adjust the color and other elements of your photos. Todd and Diane recommend VSCO, Snapseed, and Photoshop Express.
Incorporate photography basics:
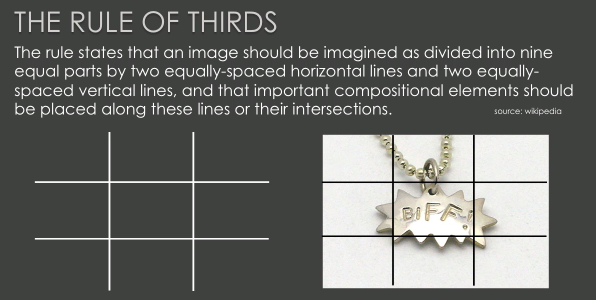
Regardless of what you’re shooting on, you can still elevate your product photography by playing by the rules. All photographers are familiar with the “Rule of Three,” a rule of thumb that can make your product images more visually interesting. Instead of centering your product right in the middle of your photo, set it slightly to the side, and turn it some. Here’s an example from creative consultant and entrepreneur Marlo Miyashiro, who taught herself how to take photos as a way to get her jewelry into trade shows.
…as compared to:

Whether you’re using an iPhone or a fancier digital camera, you probably have a grid setting, which can help you more accurately place your product in the first or third section of the image. That way, you’ll have a more interesting, creative product shot — which can subtly prod buyers into making that purchase.
Light it right:
One of the biggest mistakes that crafters make is relying on unflattering lighting options, like the flash on their camera, or their overhead light. Unfortunately, unnatural, harsh light just doesn’t make your products look good, and can subconsciously turn off potential buyers. But you don’t need a high-quality set-up to get a beautiful, soft light source — luckily, the best light in the world is natural light, not artificial light.
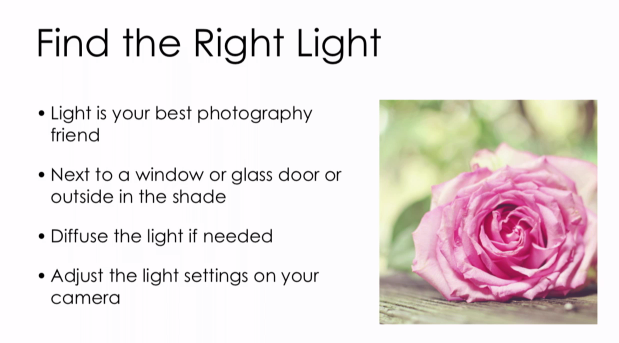
April suggests setting up your shots next to a window, or outside in the shade to find the most flattering lighting setup. And, she says, feel free to play with it.
“If you’re finding that the light is too bright, try putting up a sheer curtain,” April suggests. You can also experiment with the settings on your camera to figure out which light looks the best.
Get creative with angles:
You may be worried that too abstract of photos might not exactly show your product. But as long as your product descriptions are accurate, you probably have a lot more wiggle room to play with your photos than you think. For example, playing around with different angles. Say you’re selling a bracelet — are you looking to emphasize the shape of the thing or the craftsmanship of its parts?
“The bracelet is a round, small thing. We all know that,” Marlo explains, “What I challenge you to do is get creative about the way you take your photos.”
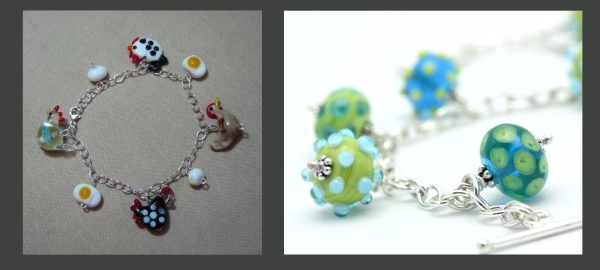
Rather than shooting a straight photo from the top down, consider trying out a more artistic angle, which really shows off the intricacies of your piece.
Use props:
Stark white backgrounds may work for giant companies, but for your handmade goods, you should sprinkle some personality into your brand images. Shooting your products in the wild — whether it’s in your yard or on your kitchen table — can add depth and texture to your images, and helps provide scope and size comparison. Even just having a few pieces that you default to (April shot this image with an old window pane that she says she uses all the time) can help a potential buyer get a better understanding of exactly what they’re purchasing, while also making the product look appealing.
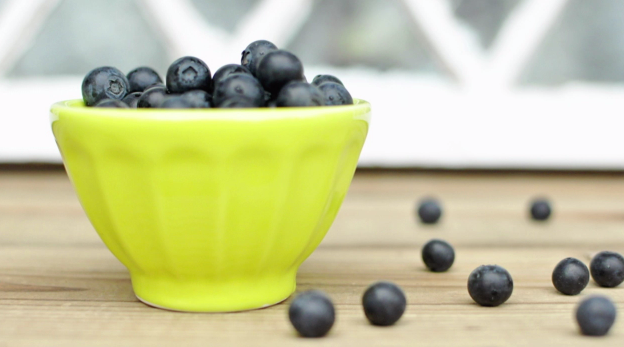
Props don’t have to be expensive, either. “Most of this stuff, you can just find on the side of the road,” April says. A wood pallet from a construction site, a sheet with a delicate pattern, or even just your kitchen counters may be exactly what you need. Just make sure your background isn’t so distracting that it takes away from the product itself.
Many crafters treat product photography as an afterthought — but they shouldn’t.
“Good product photography is the most important part of selling your crafts,” Madison explains. “It makes the difference between a sale and no sale.” And there’s no reason to invest in professional product photography when you can create your own great photos with just a few product photography tips.


