
Yellow teeth are a common problem in portraits — sometimes the lighting can even make them appear more yellow in photos than they do in person. Thankfully, Photoshop has a few good tools for whitening teeth. But, there’s a fine line between Barbie white and a realistic white that would make any dentist proud. Ben Willmore shares how to whiten teeth in Photoshop in this week’s quick tip.
Are you ready for the biggest Photoshop event of the year? Join CreativeLive for Photoshop Week 2018 to learn how to produce professional quality photos and reach your full creative potential. RSVP Today.

First, you’ll probably notice that we’re not actually using Photoshop, but a program bundled with it — Adobe Camera RAW. While you can whiten teeth in Photoshop, the adjustment brush tool in Camera RAW makes quick work of yellowed teeth, so for this tutorial, you’ll open your image in Camera RAW.
Once the image is open, zoom in on the teeth using the magnifying glass so you can easily see all the teeth.
For teeth whitening, the adjustment brush is the best tool because it allows you to adjust more than one element, so you can get a realistic white quickly. Selecting the adjustment brush (it’s the paintbrush on the top, towards the middle) brings up an adjustment panel on the right where you can make adjustments to only the parts of the image you paint over, which in this case is the teeth.
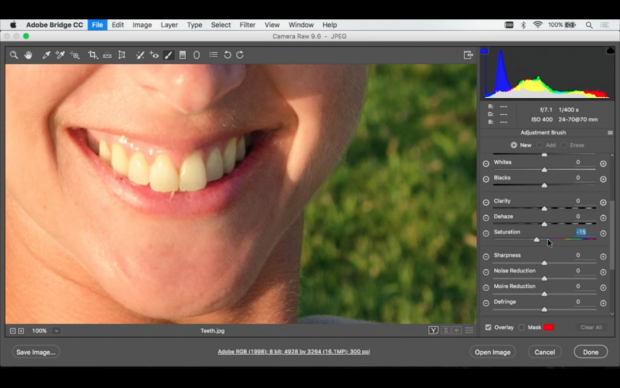
Over in that left adjustment brush panel, you’ll use a few different sliders to whiten the teeth. Don’t worry about getting them perfect just yet — first that’s impossible when you can’t see the changes quite yet and second you can fine tune after you’ve applied the brush. Bring the highlights slider to the right to brighten up the teeth. Dragging the saturation over to the left will remove some of that color but don’t drag it all the way over or you’ll end up with gray, not white.
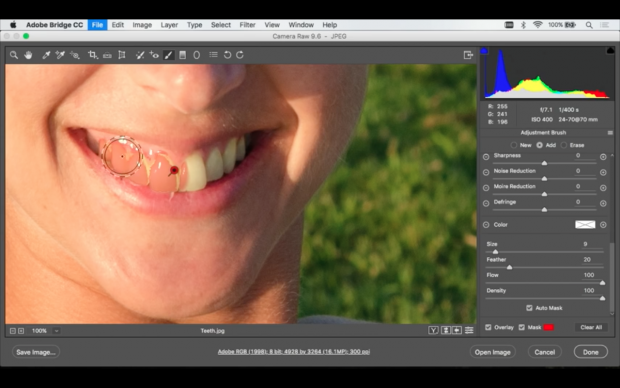
The panel also contains your brush options. For the size, choose something about the size of the teeth so you don’t take forever but you don’t get more than the teeth. The feather fades out the edges, which you don’t want a lot of so keep that slider low, for example around 20. Turn both flow and density up to 100 to tell the program that you want the effect to be applied without any transparency.

At the bottom of the adjustment brush panel, make sure the auto mask option is checked. Auto-mask allows the program to find the edges for you, which makes selecting only the teeth simpler.
Next, move the brush over the teeth and begin to paint over them. Watch the small dot or cross hair in the middle — that’s what directs that auto mask feature so make sure that doesn’t touch anything but teeth. The important part in this step is to make sure you get all of the teeth.
Tip: Check the Mask Overlay option and everything you paint over will appear red, making it easy to see what areas you’ve adjusted.
If you got some of the surrounding areas like gums or lips, go back to the top of the adjustment panel and select the erase option. Make your brush a bit smaller than paint over the areas you don’t want to be adjusted.
With the teeth (and only the teeth) painted, go back to the adjustment panel and uncheck the Mask Overlay and Auto Mask options so that you only see the image as it is. Then, fine tune your adjustments going back to the highlight and saturation sliders. The goal is to find a happy medium — not enough on the saturation slider will still leave them yellow, too much will make them gray. Brightening up with the highlights slider too much will also make it obvious that the teeth were whitened in Photoshop. You can also use the temperature slider, moving it towards the blue, but only a bit — too far and they’ll become blue.
Using the adjustment brush tool in Photoshop’s companion software Camera RAW is a quick and simple way to whiten teeth. While it’s simple, it’s also realistic because it maintains all the shadows and slight variations. The method is also more versatile than using the dodge tool to brighten since you can also pull back the saturation to eliminate that yellow.
Are you ready for the biggest Photoshop event of the year? Join CreativeLive for Photoshop Week 2018 to learn how to produce professional quality photos and reach your full creative potential. RSVP Today.


