Photoshop offers a number of tools that makes cutting an object out of a photo easy — that is, until you get to the hair. Thousands of strands of hair going in multiple directions is a nightmare for any selection task, whether that’s because you need to apply a selective edit, remove the background or to compost multiple images together. Thankfully, cutting out hair in Photoshop doesn’t have to be a complete nightmare with a few tricks — including the Select and Mask tool introduced only last year. Here’s how to mask hair in Photoshop CC, the quick and simple way.
Before you start
High-end Re-toucher and CreativeLive Instructor Lisa Carney says mastering how to mask hair in Photoshop CC is an advanced technique, but one of the simplest methods for users new to masking fine objects is using the Select and Mask tool. To start with though, Carney suggests creating a solid color layer that’s the opposite of whatever color the actual background of the photo is — for example, if the background has a lot of green trees, create a new layer and fill it with red by going to Layer > New and using the paint bucket to fill in the layer with color. You’ll eventually delete that color layer, but using an opposite color makes it easy to see what your edits.
Start with the quick select tool

The Select and Mask Tool can be used from scratch, but it’s typically faster to make a rough mask of the object — in this case the hair and owner of said hair — first. To do that, select the quick select tool, place the tool on the background and while holding shift, drag around the background. Don’t worry about getting the selection perfect, just get a rough selection of the hair. Go ahead and invert that selection so that the person and hair is actually selected, not the background, by hitting shift + command + i on a Mac or shift + control + i on Windows.
Interested in using photoshop to perfect your portraits? RSVP and join acclaimed instructor Lisa Carney Portrait Retouching on June 21

Create a Mask

Next, create a mask of that rough selection. Head into the layers window and tap the icon to add a vector mask at the bottom — it looks like a rectangle with a circle inside. Once you click to add a mask, you should see a second box in the layer icon showing a black and white mask of your clipping.
Refine with Select and Mask
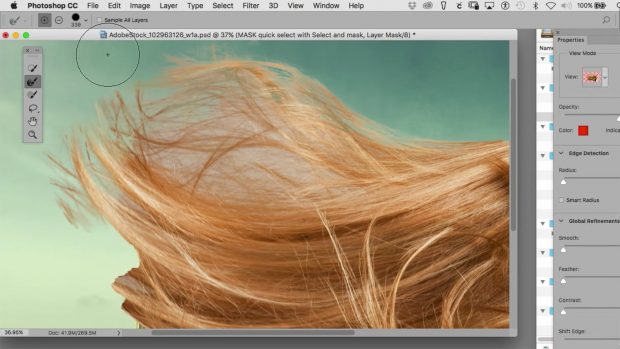
Now you have a hair mask — but not a very good one. With the layer you just created the mask on still highlighted, head up to Select > Select and Mask. You should see the mask you just made on a transparent or semi-transparent background. Inside this mode, use the second tool in the toolbox on the left, called the refine edge, to turn your rough selection into an even more accurate one. When the brush has a plus icon in the middle, you are adding to that selection, or adding in hair that you missed with the first selection. When the brush has a minus sign in the middle, you are removing pieces from the selection. You can hold down control to switch to the subtract mode, or use the icons next to the brush size. Leave the settings on the right side, such as the radius, on the default options.
With this tool, concentrate on getting those fine details, like the edges, stray pieces of hair and areas where the background shows through a thin area of hair. (Cleaning areas of the hair with a straight edge are often easier to adjust in the next step). Start with a semi-large brush to take care of large areas, then, for the most accuracy, zoom in and use a smaller brush size for more detailed selections. The Select and Mask tool automatically detects edges, even in semi-transparent areas like thin strands of hair, though masking on a busier background will require more fine-tuning with that smaller brush.
Once you’ve masked the finer details, hit okay to return to your image.
Interested in using photoshop to perfect your portraits? RSVP and join acclaimed instructor Lisa Carney Portrait Retouching on June 21

Continue adjusting with the mask and a paintbrush.

If your mask still needs a bit more refining, click on the layer mask and use the paintbrush to continue refining any edges. Press D on the keyboard to return your colors to the default black and white, then paint white for areas you want included in the mask, and black for areas outside the mask. While the Select and Mask tool typically does a good job, larger areas and straight edges are often easy to adjust just by painting inside the mask.
Remove halos.

Often, masking hair leaves an edge that’s not quite right and is often a bit brighter than the surroundings, called a halo. To remove that halo, option click on your mask in the layers panel to select the mask. Now, with the hair mask selected, head up into Select > Modify > Contract. Select one pixel, then hit okay. This selects just inside the mask.
Now, inverse your selection so that the background, not the hair, is selected using the keyboard shortcut shift + command + i on a Mac or shift + control + i on Windows. Now, you are going to fill that background layer with black by hitting shift + delete. In the pop-up window, select black from the “contents” option and click ok.
By contracting the background by just a pixel, you can easily remove the halo.
At the end of this process, you may not have every single strand of hair selected. While you can spend hours creating the perfect hair mask, Carney instead creates a tight mask, then fine tunes by actually painting in more hair with a paintbrush as she continues to work on the image. While editing hair in Photoshop can continue well beyond that initial mask, learning how to mask hair in Photoshop CC with the Select and Mask tool turns the tough task of cutting out hair into a much simpler process.
Interested in using photoshop to perfect your portraits? RSVP and join acclaimed instructor Lisa Carney Portrait Retouching on June 21