
Hanging canvas wraps is a great way to market a photography studio. Whether it’s decorating your own studio space, or hanging images in a public space, canvas wraps can be very effective marketing tools, not to mention items to sell to clients. But, they also happen to be pretty expensive, especially if you want to change them often to show off your latest work.
Photographers can save quite a bit of cash by creating their own gallery wraps, reducing marketing costs or allowing for more frequent updates. Julia Kelleher shows just how to create a DIY canvas gallery wrap in this video tutorial. Watch how Julia creates canvas wraps for her studio, then refer back to these steps as you make your own.
What you’ll need:
Stretcher Bars – This is the wooden frame that your canvas will wrap around. Choose the size that you’d like your final canvas to be.
Staple Gun – An electric staple gun is easier to work with, but a manual one will do too.
Staples – Staples that fit inside your staple gun of choice.
Pit Bull Gripper – Pit Bull Grippers are essential for getting a tight fit to the canvas. They’re sometimes called gallery canvas pliers and are available online and at art stores.
Scissors
Pencil
Canvas
How To Create a Gallery Canvas Wrap
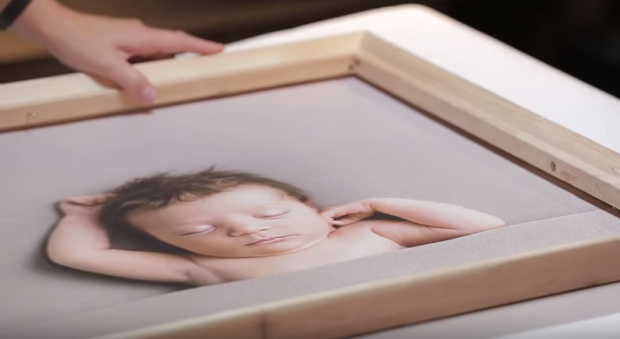
1. Print your canvas. When you print out a canvas for a gallery wrap, the sides will wrap around the edge a little. To avoid having white on the side of your finished canvas, make sure the image is large enough by extending your border by about two inches in Photoshop (or going a little wider with the crop during the initial edits). When selecting a print size, make sure you allow at least two inches extra inches over your desired wrap size.
2. Line up your canvas. Once your image has been printed, lay it down flat, face up, so you can see the image. Lay your stretcher bars over top and make sure it’s centered and straight over the image. Then, pick up each corner of the canvas and use a pencil to mark where the corner of the stretcher bar is on the backside of the canvas.
3. Flip. Once you’ve marked all four corners, flip the canvas over and place the stretcher bars on top again. Make sure you flip the canvas and stretcher bars in the same direction, so your marks line up exactly. Line up the corners of the stretcher bars with the marks on the back of the canvas.
4. Staple one end. The trick to getting a good, tight fit on your gallery wrap is to work in a certain order. Start simply by folding one edge of the canvas around the stretcher frame and stapling it to the frame. Use several staples across the middle, but don’t tack the corners yet.
5. Staple the opposite end, starting with the edges. On the edge across from the one you just stapled, use the pit bull gripper to pull the canvas tight. Start on one edge, and staple it, then work the other edge, instead of going from edge to middle to edge. That helps achieve a uniform tightness across the whole wrap.
6. Tack down the remaining edges by starting in the middle. Tack down one of the remaining sides, this time putting a few staples in the middle. Flip the canvas, and, starting in the middle again, use the pit bull gripper to pull the canvas tight and staple the middle. Then pull and staple the edges by going back and forth again, instead of straight across the canvas, for a uniform tightness. Once that side is finished, flip and tack down the edges of the side you only stapled in the middle.
7. Perfect the corners. Moving to a corner, fold in one edge so it’s flat against the frame and staple it. Then, pull that second edge in until you have a clean edge. Cut off any excess canvas as needed. Use the pit bull grippers to pull that second edge tight, then staple it down. Repeat this step for all four corners.
8. Trim, and hang. With all the corners tacked down, cut off any excess canvas in the back. Then, your canvas wrap is tight, finished and ready to hang up.
For more time saving studio marketing and organization tips, check out Julia’s Studio Systems Bootcamp.


