
I picked up a camera as a kid and loved being able to photograph pretty much anything I found interesting. I didn’t give much thought to why or how the camera worked: I just stuck in a cartridge of 110 film and went out into the world to explore. Eventually, my interest in photography evolved, and I started to learn more about how to take better photographs.
One of the phrases I heard over and over as I learned was that “We stand on the shoulders of the photographers that came before us.” The instructors that I heard say this were typically talking about modern day styles of photography, specific techniques, or a generalized approach to how to think about creating photographs. Rarely were they referring to the historical aspects of photography. I never really wholly bought into the idea of standing on those shoulders—because it seemed to be from a limited viewpoint. It was a trip to a museum, and seeing pictures that had been made more than 150 years ago, that set in motion my desire to connect to the history I was becoming a part of…
Photographers: The History You’re Becoming a Part Of
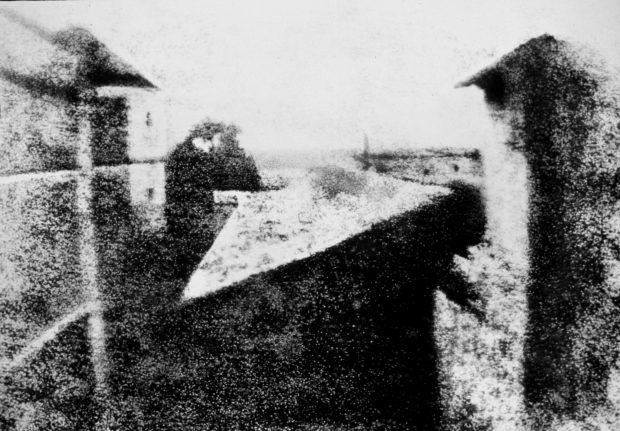
It is hard to imagine a world without photography. Today, billions of people take billions of photographs that they can share around the world instantly. And yet, photography’s history only goes back about 200 years. Niepce’s first stable photograph was created in 1826 or 1827. If you think back to those earliest days of photography, people weren’t trying to count megapixels, arguing about dynamic range, or discussing editing and sharing a photograph. Those earliest days of photography were about just trying to capture light and make it last over time on a light-sensitive material.

In my imagination, those early days of photography were populated by a bunch of mad scientists. It didn’t matter if it was Henry Fox Talbot, Louis Daguerre, Sir John Herschel, or Frederick Langenheim, Frederick Scott Archer: everyone who was working in photography at the time was trying to find a way to capture the real world through a photograph. Much like the digital advancement of today, photography’s growth in those early years was fast and furious. As those earliest photographers began to realize how they could use sensitized metals to create those latent images, there was no stopping the photographic train from leaving the metaphorical station. And yet, even while those earliest photographers and scientists were focused on making plates and prints that would capture and hold the light, the field of photography was art from the start as well. The artistic nature of the earliest photographers emerged in portraiture, landscape, and street photography.
Expand your creativity and explore alternative photographic processes. Learn more.

The earliest photographs were mostly made on metal plates using Daguerre’s process, commonly known as a daguerreotype. While this process resulted in a stable image, the only way to duplicate an image was to take another picture of the original daguerreotype. When Talbot developed the calotype (paper negative) in 1841, it became possible to make multiple printed copies of an image from a single source. At the same time that Talbot was developing his process, John Herschel and Janez Puhar were each creating a glass plate negative process. Puhar’s process, due to the simplicity, became a common method for making glass plate negatives. The process made it even easier to make prints over and over again from the same source negative. In 1851, Archer and Le Gray had both developed—independently from one another—the colliding process that became one of the most common methods for making glass plates, until the mid-1880s when gelatin-based films were developed.
The use of glass plate and gelatin-based film became the common form of capture in camera. Just as there was a lot of refinement for the creation of the negative, there were also a number of photographic processes for printing those negatives developed in the mid to late 1800s. Although many of these printing processes were refinements or experiments with other metals or chemical combinations from existing printing methods, some of our photographic printing methods were born out of projects not related to photography. For example, Sir John Herschel is credited with the development of the cyanotype, but he was attempting to find a new way to create blueprints. However, in recognizing that he had created a light-sensitive iron metal reaction, he was able to find a new way to print images. As the years moved on, the field saw printing methods such as platinum, VanDyke, salt printing, kallitype, and countless other methods being used to create printed photographs from glass and gelatin plates.

As photography continued to evolve, the process became easier and easier. In 1900, Eastman Kodak released their Brownie camera with roll film that could be shot and used by anyone. As a photographer, you would get your camera and take your photographs. You would then snail mail (called just mail then) back the entire camera, and Kodak would process your film, give you prints, and reload the camera. Eventually, roll gelatin film was more readably available, and most photographers switched to using film as their means of capture. This left the larger glass plates and larger format cameras to a smaller subset of photographers. In the 1910s and 1920s, due to a variety of factors from cost to ease of manufacturing, silver gelatin printing, which became commercially available in 1874, became the most common printing practice for photography. This evolution meant that many of those earliest processes fell out of practice.
Expand your creativity and explore alternative photographic processes. Learn more.
Luckily, most of that early work was documented and shared in some photographic journals and historical texts that were archived by larger libraries and online archiving projects. Because much of that original information wasn’t lost, we’ve been able to continue to use some of those earliest methods to create photographic prints, and there as always been an interest by some photographers to stay connected to those earliest methods.
The Challenge of the Historical Photography Processes
Until recently, if you happened to be a photographer interested in working in a historical process, you were pretty much required to use a large format camera, because the older processes required you to contact print your image. That is, when you were contact printing, the negative had to be in direct contact with the substrate that you were printing on, which meant that you didn’t have an opportunity to enlarge the image. So, if you had a negative that was 2” x 3” then the largest print you could make was 2” x 3”. This is why most historical process printers used the larger format cameras like 8 x 10 or larger: a bigger camera meant bigger prints.

For many photographers, the use of the larger format camera was a significant cost, weight, and process barrier to entry for working with these historical processes. Large-format cameras were (and still are) expensive, slow to set up and use, and bulky to carry. This is even truer today as many photographers have learned the craft in a digital darkroom and have little to no experience working with film, let alone a large format camera. The great news is that we can now use digital darkroom printing techniques to create negatives for use in historical process printing.
How Photographers Are Embracing Historical Processes Today
Today, we can take any image, no matter the source—iPhone, DSLR, or scanned film file—and make a digital negative that can be used for printing in pretty much any historical process. The other amazing thing about working in this modern workflow is that you are no longer limited to being only a photographer. As long as you have a digital file—be it a composited image, illustration, or drawing—you can use that file to create a digital negative to print in one of these old processes.
Another great aspect of working in the digital negative space is being able to print in a variety of sizes for a variety of methods. Because you are creating a digital negative on your printer, you can create images in a variety of sizes, and you aren’t limited to a single historical process. So, if you want to create a 4” x 6” cyanotype of an image and a 16” x 20” palladium print of the same image, you can just print the two negatives and make both the larger and the smaller prints. There is so much flexibility working with digital negatives that it opens great doorways into thinking about photography in new ways.
Although the process might conceptually seem a little overwhelming, the digital negative workflow has been around for going on 20 years. Much like those early years of photography in the 1800s, the past 20 years have been a time of rapid learning and growth the field, and a variety of processes have been developed, refined, and documented. As long as you have an understanding of some the basics of Photoshop, you will be able to take those first steps to creating a digital negative.
The biggest challenge in the process today is getting our modern printers and computers to understand the tones and values of the historical printing methods. Regardless of which method you select to make the negative, you will make a tone map that provides the instructions for Photoshop and your printer to talk to your historical process. If you are at all familiar with color management, this is analogous to creating an ICC profile for a custom paper.
The other big question that I get asked a lot about this workflow is: “What options are there for alt processing, and is it hard to get a good print?” Well, to answer the second part of that question first, just like with the photography that you are used to, the quality of your negative will determine the quality of your print. So having a good negative to start with is critical, but as long as you have a good negative, it is easy to print.
As for the process options, pretty much any printing alternative process will work. If you have to make some modifications to the old process to work with the modern tools, it is often easy enough to change, and rarely is there a process that you can’t work in.
At CreativeLive
In the class on CreativeLive, we are working with cyanotypes, VanDykes, and platinum/palladium printing methods. However, there are dozens of other processes, such as kallitypes, salt printing, albumen printing, argyrotyes, carbon printing, and a host of other techniques. While each process is unique and has different looks and feels, you can work in nearly all of them with a digital negative.
I like to start people off working with cyanotypes, because it is low cost, a great way to learn how to coat paper, and super easy to work with. If you don’t know what a cyanotype is, odds are you have seen one. Cyanotypes are prints that have a strong bluish tint to them. They are easy to make and can be done easily and safely. I have taught and worked with a number of instructors who teach cyanotypes to children. It’s a fun process with great results.
I like the VanDyke method, because it uses some silver metals to create the image. This use of silver is one of the steps in the evolution of a photograph toward silver gelatin-based printing. It’s simple to print and process. The results are a beautiful and rich brown color. They often look similar to a warmer platinum/palladium print. This process also introduces you to using a fixer to stabilize the images. In looking back at the history of photography, the earliest images were not stable enough to survive for more than a few weeks at most. Sir John Herschel was able to stabilize prints using Sodium Thiosulfate. When asked what he did, he replied that he “fixed” the image, which is why we call this part of the processing fixing.
Platinum and palladium printing is beautiful and highly archival. These prints have a rich tonal scale and value that is unlike any other process. At one point, platinum printing was one of the more common methods of making a photographic print. There were several companies selling platinum paper in the late 1800s, but with the rising cost of platinum and WWI supply shortages, silver gelatin printing eventually became the norm.
Unlike working in a digital space, these older processes are all chemical based. Sometimes I get asked about safety when working with these older processes. I would be lying if I said they were without risk. Some of these older processes have toxic chemicals and require you to be extremely careful when working in the process, but others are relatively easy to work with. For each process, there are tons of documentation and resources that you can use to find out how to safely and efficiently work in the method.
Finally, the process of making a historical print is unique. Each time you coat the paper, your hand as an artist is extended into the work. No two images are exactly the same and yet they are related from print to print. As I think about how my work matters to me, I realize that I love how photography allows me to see, experience, and relate to the world. I also love how working with historical processes allows me to find a unique image that is still somehow connected to the rich history of the capture of light.
If you’ve ever admired photographs from the 1800s or early 1900s, I encourage you to try your hand at one of the historical processes. There’s nothing like coating your own paper and making your own print by hand. There is a connection to the work that is different than when we sit at a computer screen. With so many options to choose from, I’m sure that you can find a look or process that interests you. Worst case scenario, you’ll learn about how photography used to be done before computers and iPhones. Best case scenario, you find a passion and connection to your photography that you didn’t have before.
If you’re looking for more information, you can find all sorts of resources online, and companies like Bostick and Sullivan sell kits that can get you started. I wish you the best of luck, and I hope to see your take on our collective history of photography.
Expand your creativity and explore alternative photographic processes. Learn more.


